

Vocabulary
Parivrtta Surya Yantrasana
Parivrtta = Revolved
Surya = Sun
Yantra = Instrument, usually a mystical diagram
Known in English as Compass Pose or Sundial Pose.
To get straight into Compass Pose (after an appropriate warm up), head on over to the the middle bit, we’ll catch up with you!
One of the most helpful lessons I learned in Yoga was how sometimes all I need to do is take another look. Different postures are often the same but placed differently in space. Rather than trying to learn each posture on its own and find comfort on that island, I realised that many of these postures could be grouped together. If I could only find the thread that connected all of them.
A lot of mixed metaphors! Forgive me!
Compass Pose is usually done seated. With the back thigh lifting off this becomes a modified version of the arm balance posture often referred to as ‘Flying Compass Pose’. In the flying version, the back leg is outstretched in the manner of a side plank. Keeping the back knee down makes the posture more accessible as the balance requirement is reduced.
I have also come across the flying version being referred to as Visvamitrasana, Pose dedicated to the Sage Visvamitra. From what I understand, in Visvamitrasana, the top arm reaches up to the ceiling. The posture is advanced by reaching the top arm to catch hold of the floating foot.
Ok, let’s go back to this idea of finding comfort. Asana refers to being comfortable and steady in a posture. But, but, BUT.How does one get comfortable in a posture that is simply not comfortable? You know what would be comfortable in Chair Pose? An actual chair to sit on. Not a pretend chair made of the steam that rose up from my burning thighs. How does one find steadiness when balanced upside down on two hands? Aside from taking the variation of face-planting, which is steady but distinctly uncomfortable, ow my nose.
Finding Comfort:
Different people will have different ways to seek out comfort and steadiness.
A good rule of thumb to check how you’re doing is to ask yourself if you are breathing – slowly, steadily, with awareness or if you are holding your breath.
Another one is to check on your level of attention – are you focused, gazing steadily, or frowning hard at the current task.
You can also check how you are holding yourself – soft, relaxed but actively engaging your muscles, or tensing, hunching the shoulders around your ears, biting your lips and so on.
That last one will give you an idea of how okay you feel with the outcome of your practice. Ask: Do you have to nail this posture today?
Be calm and trust the unknown. For me, finding comfort means being okay with what is going on and feeling comfortable with my body and believing in the ability of it to support me wherever I end up. If I hold my breath I know I am fearful and tense. Knowing that being ‘successful’ in any posture won’t make me a better person, and ‘failing’ a posture won’t mean I am a bad person allows me to practice with detachment. I feel OKAY with the possibility that today may not be the day I get my leg behind my head or fly my compass, or leap like Hanuman into the splits. And I am then free to practice.
Understand the difference between challenge and strain. There may be awareness of some intense stretching sensations or a serious amount of strength being demanded or that, “Do you smell smoke? Because I KNOW my quads are on fire” feeling but through all of that I understand the individual actions I am performing and I am BREATHING calmly. Maintaining a steady and calm breath means I am less likely to exceed my limitations for the day and end up hurting myself, physically and emotionally. It’s so important to practice with compassion! Yoga practice is not a torture practice. If I get my breathing under control, my thought patterns change from scattered, critical, irrelevant, tense to focused, precise, quiet and steady. And I feel okay, fine, maybe even peaceful. Despite the smoke signals.
Learning New Poses, like Compass Pose
I’ve noticed that people learning a sequence like the Sun Salutations would try to hurry through the current posture to get into the next and become breathless. If they are asked to focus on breathwork, they report feeling less frazzled, especially if instructed to allow the breathing to slow down. It’s the same for learning a new pose. This was my personal experience as well.
The first time I saw someone in the full flying version of Compass Pose, I remember thinking, “HOW did you get there?”
The first time I experienced being taught the full flying version of Compass Pose with the body in an extended side plank position, I had forgotten about that person and was thinking to myself, “Where is this going?”
Anyway, once we were there* in the posture (as close to ‘there’ as a first attempt could feel, accompanied by me calling out, “Um, something like this?!”) I didn’t feel great, I just felt awkward, weird, gangly, tired, sore, confused, frustrated, and EXTREMELY UNCOMFORTABLE. All my limbs were crying, “ARGH we don’t belong in this configuration.” My breath was erratic just like my thoughts. I didn’t recognise where I was and I was freaked. I had also forgotten about the idea of comfort and steadiness in my posture. I didn’t fall out of the posture but crashed, backwards on my bum.
You know how sometimes people learn a new posture and they seem so elated? That was not me. I was just bewildered. I couldn’t wait for naptime Savasana and then also lunch.
At the time of that class, I was familiar with side plank and had developed a healthy dislike of it. (I won’t pretend I like it much these days but I see the value in it and I appreciate it.) I had also experienced the seated compass pose. And although I knew how to add I wasn’t connecting the dots between the two postures and my current extremely uncomfortable mess of tangled limbs. I was so suspended in this huge reaction of being uncomfortable that there was just so much disconnect between my body and my mind.
But could I really claim to have learnt that posture that day?
Later on after a day or a week or let’s be honest, more like a month had gone by, I took a closer look at what went down. Ohhhhhhhhh heyyyyy…. that kind of looks like if I did that stretchy side thing with my top arm whilst balancing in a sideways plank. But how the heck do I get into it again? What leg goes with what hand? What does this foot back here do? If I go into side plank, I can’t get the front foot off the floor. If I lift the front foot off the floor, I can’t get into side plank. UGHHHHH.
Over time as I played around with the different shapes, I sort of made friends with this posture. I wouldn’t call us bosom buddies or the kind of friends that need to be together all the time, more like a long distance good friendship. We’re happy to see each other when we can but if we don’t, that’s okay too, maybe another time, we’ll catch up and see what the other is up to.
THE MIDDLE BIT: Finding Compass Pose
Let’s see if we can’t get you two acquainted:
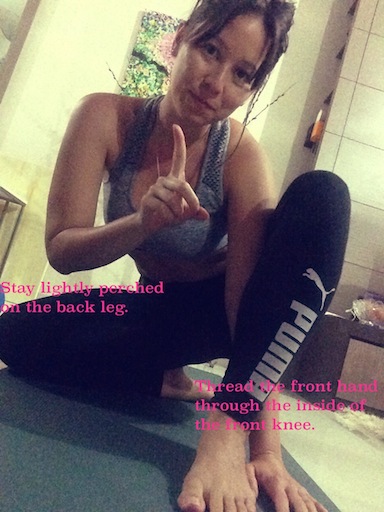
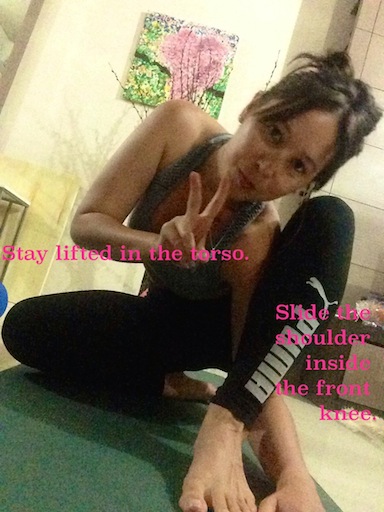
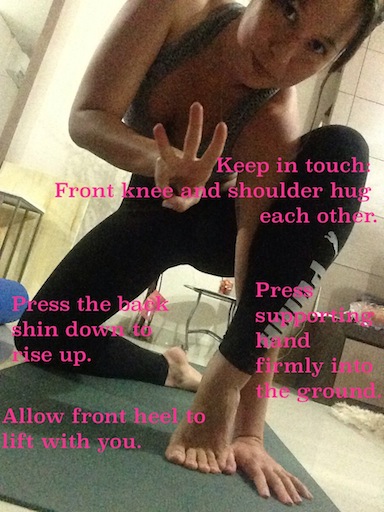
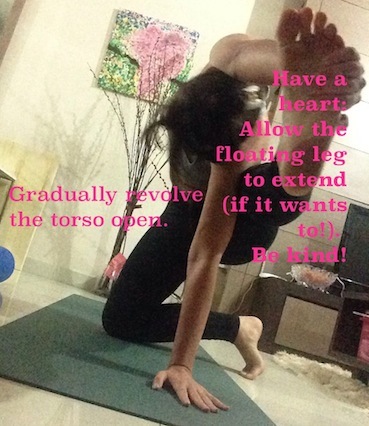
To enter (hover over each photo for detailed instructions):


Got it?

From here: Gaze upwards, or if that is uncomfortable simply look ahead. In this instance I just gazed directly forwards rather than up as my torso wasn’t revolving as far as usual. What I would go on to do is go back to opening my hips a little more and do you see how that back thigh may want to press forward a little more? I’d work on those and then revisit the posture again and see if anything has changed.
Alternatively:
- Keep the front leg bent
- Float the front foot off the floor and keep the top arm flat against your side or reaching upwards
- Feeling really steady? Try again with your back leg stretched out in one line with the rest of your body
- Practice the seated version of the posture, back leg bent or stretched out directly in front or half crossed
- Stop at whichever step is most appropriate to you and stay there
Whatever variation you take, keep breathing and stay calm!
Inhale, release the foot; exhale, take a moment. Switch sides. Let me know how you went!
Note: I cannot stress how important it is to practice with awareness. The most important tool for me has been to learn to understand my body. Learn about your body, become aware of what conditions it thrives under and what conditions it does not. Do not force. Find a teacher you can trust to guide you.
Take care and be well! x
*what does ‘there’ mean anyway? In the beginning of practice I would think of ‘there’ as the place where I matched the picture in Light on Yoga. I currently think of ‘there’ as where I can go based on who I am on a given day but I don’t know until I start moving where I will get to.
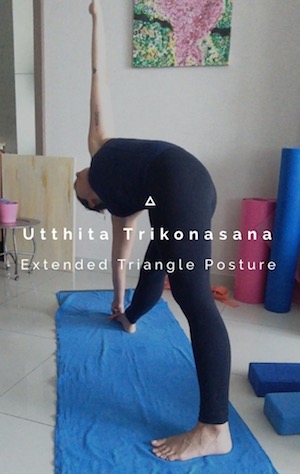 Utthita = Extended