“perhaps just get more kind to yourself and those around you”
— apt words from my June horoscope
Once in a while I’ll stumble upon a horoscope, article, instagram and marvel at how perfectly these small happenings are timed to lessons and themes I am currently working on. For instance, the last few months have been really focused on the concept of kindness and softness. They’re NOT easy! It has taken so long for me to break down my need to never show softness and never backdown to really embrace how being soft can be a different kind of strength. Life isn’t just about how good a smackdown you can give or how feisty you can be. It’s terrifying and exhilarating to find that within all that being gentle, deep down there is a reservoir of true strength to withstand all outside forces as well as all the inner crazy. The best defence may be a good offence in sports but in life the best defence is inner strength.
Continuously working on the ability to stay perfectly gracefully still despite everything going on will build up your strength reserves mentally as well as physically. You’ll only get stronger this way and you’ll always feel centered, because your center is strong! Today’s drill is the perfect physical illustration of that wonderful kooky circular logic. You’re staying as still as you can, whilst working on strengthening your core and you won’t need to do a single crunch, hurray! It works for me and I hope it will for you too. Try it and let me know!
Enough chit-chat from me, let’s do this.
THE STAY STILL [Working title I’m sticking with this – besides aren’t we over ‘labels’ already?]
Repeat this exercise 3 to 5 times, several times a week and you’ll definitely feel stronger physically and hopefully get closer to experiencing grace under pressure, even if it’s merely during the course of a yoga class. It will be worth it – eventually that grace will translate to beyond your physical class!
Start in a kneeling position
Place your hands either side of your knees
Lean your weight into your hands and press strongly into the ground as you exhale
Breathe your belly button in and up towards your spine
On your next exhalation squeeze your knees towards your chest
Hold as you breathe in and out for 5 rounds of breathing (something like the picture above)
Inhale and squeeze your knees in a little more then
Lower down on your next exhalation. (Finally!)
Advance this by squeezing one heel off the floor and hold.
Super advance this by squeezing both heels off the floor. You’re basically ready to levitate.
If it feels horrible for the front of your feet then you can start off kneeling with your toes tucked under. As you press up you will come high up onto your toes. When you’re stronger you can try again with your feet flat.
Your back will naturally round — go with that instinct.
Use your midsection to pull your knees into the curve of your body. Squeezing your inner thighs together will help activate your core just that extra more. As much of your weight is off the floor, not just dangling into the fronts of your feet.
Even though your back is rounded, don’t hunch your shoulders into your ears! And don’t scrunch your face! All the work is deep, deep down in your core. The rest of you is to resemble the surface of still water.
What it do?
I’m glad you asked. This will work your entire core as well as your ability to maintain your straight-arm strength. With your knees sucked in as close to your body as you can you’ll notice how hard your belly is working to keep that knees to chest connection going. The back gets a great stretch too.
Alternatives for wrist issues
Just do the same thing but laying on your back and imagine your pressing your hands into the ceiling and pushing it away. You’ll still get all the benefits and you’ll have a great time curling your body away from the floor. NOT EASY. You’ll know you’re doing it right because you’ll just know.
You can build up as you get stronger by doing the alternative in addition. Make the two versions part of your regular strength exercise.
To get straight into Compass Pose (after an appropriate warm up), head on over to the the middle bit, we’ll catch up with you!
One of the most helpful lessons I learned in Yoga was how sometimes all I need to do is take another look. Different postures are often the same but placed differently in space. Rather than trying to learn each posture on its own and find comfort on that island, I realised that many of these postures could be grouped together. If I could only find the thread that connected all of them.
A lot of mixed metaphors! Forgive me!
Compass Pose is usually done seated. With the back thigh lifting off this becomes a modified version of the arm balance posture often referred to as ‘Flying Compass Pose’. In the flying version, the back leg is outstretched in the manner of a side plank. Keeping the back knee down makes the posture more accessible as the balance requirement is reduced.
I have also come across the flying version being referred to as Visvamitrasana, Pose dedicated to the Sage Visvamitra. From what I understand, in Visvamitrasana, the top arm reaches up to the ceiling. The posture is advanced by reaching the top arm to catch hold of the floating foot.
Ok, let’s go back to this idea of finding comfort. Asana refers to being comfortable and steady in a posture. But, but, BUT.How does one get comfortable in a posture that is simply not comfortable? You know what would be comfortable in Chair Pose? An actual chair to sit on. Not a pretend chair made of the steam that rose up from my burning thighs. How does one find steadiness when balanced upside down on two hands? Aside from taking the variation of face-planting, which is steady but distinctly uncomfortable, ow my nose.
Finding Comfort:
Different people will have different ways to seek out comfort and steadiness.
A good rule of thumb to check how you’re doing is to ask yourself if you are breathing – slowly, steadily, with awareness or if you are holding your breath.
Another one is to check on your level of attention – are you focused, gazing steadily, or frowning hard at the current task.
You can also check how you are holding yourself – soft, relaxed but actively engaging your muscles, or tensing, hunching the shoulders around your ears, biting your lips and so on.
That last one will give you an idea of how okay you feel with the outcome of your practice. Ask: Do you have to nail this posture today?
Be calm and trust the unknown. For me, finding comfort means being okay with what is going on and feeling comfortable with my body and believing in the ability of it to support me wherever I end up. If I hold my breath I know I am fearful and tense. Knowing that being ‘successful’ in any posture won’t make me a better person, and ‘failing’ a posture won’t mean I am a bad person allows me to practice with detachment. I feel OKAY with the possibility that today may not be the day I get my leg behind my head or fly my compass, or leap like Hanuman into the splits. And I am then free to practice.
Understand the difference between challenge and strain. There may be awareness of some intense stretching sensations or a serious amount of strength being demanded or that, “Do you smell smoke? Because I KNOW my quads are on fire” feeling but through all of that I understand the individual actions I am performing and I am BREATHING calmly. Maintaining a steady and calm breath means I am less likely to exceed my limitations for the day and end up hurting myself, physically and emotionally. It’s so important to practice with compassion! Yoga practice is not a torture practice. If I get my breathing under control, my thought patterns change from scattered, critical, irrelevant, tense to focused, precise, quiet and steady. And I feel okay, fine, maybe even peaceful. Despite the smoke signals.
Learning New Poses, like Compass Pose
I’ve noticed that people learning a sequence like the Sun Salutations would try to hurry through the current posture to get into the next and become breathless. If they are asked to focus on breathwork, they report feeling less frazzled, especially if instructed to allow the breathing to slow down. It’s the same for learning a new pose. This was my personal experience as well.
The first time I saw someone in the full flying version of Compass Pose, I remember thinking, “HOW did you get there?”
The first time I experienced being taught the full flying version of Compass Pose with the body in an extended side plank position, I had forgotten about that person and was thinking to myself, “Where is this going?”
Anyway, once we were there* in the posture (as close to ‘there’ as a first attempt could feel, accompanied by me calling out, “Um, something like this?!”) I didn’t feel great, I just felt awkward, weird, gangly, tired, sore, confused, frustrated, and EXTREMELY UNCOMFORTABLE. All my limbs were crying, “ARGH we don’t belong in this configuration.” My breath was erratic just like my thoughts. I didn’t recognise where I was and I was freaked. I had also forgotten about the idea of comfort and steadiness in my posture. I didn’t fall out of the posture but crashed, backwards on my bum.
You know how sometimes people learn a new posture and they seem so elated? That was not me. I was just bewildered. I couldn’t wait for naptime Savasana and then also lunch.
At the time of that class, I was familiar with side plank and had developed a healthy dislike of it. (I won’t pretend I like it much these days but I see the value in it and I appreciate it.) I had also experienced the seated compass pose. And although I knew how to add I wasn’t connecting the dots between the two postures and my current extremely uncomfortable mess of tangled limbs. I was so suspended in this huge reaction of being uncomfortable that there was just so much disconnect between my body and my mind.
But could I really claim to have learnt that posture that day?
Later on after a day or a week or let’s be honest, more like a month had gone by, I took a closer look at what went down. Ohhhhhhhhh heyyyyy…. that kind of looks like if I did that stretchy side thing with my top arm whilst balancing in a sideways plank.But how the heck do I get into it again? What leg goes with what hand? What does this foot back here do? If I go into side plank, I can’t get the front foot off the floor. If I lift the front foot off the floor, I can’t get into side plank. UGHHHHH.
Over time as I played around with the different shapes, I sort of made friends with this posture. I wouldn’t call us bosom buddies or the kind of friends that need to be together all the time, more like a long distance good friendship. We’re happy to see each other when we can but if we don’t, that’s okay too, maybe another time, we’ll catch up and see what the other is up to.
THE MIDDLE BIT: Finding Compass Pose
Let’s see if we can’t get you two acquainted:
To enter (hover over each photo for detailed instructions):
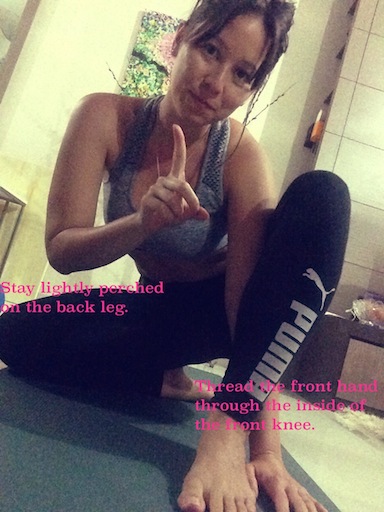
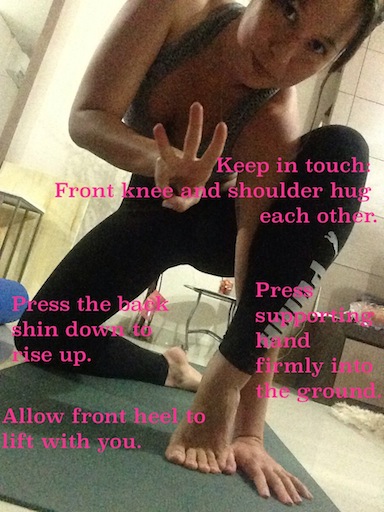
Step 1: Kneel on one knee, keeping the other leg upright, foot placed flat on the floor. Feet are roughly perpendicular: draw an imaginary straight line from the second toe of the foot out in front, down the heel, and intersecting with the ball of the back foot. The same hand as the foot in front threads through the inside of the front knee to the outside of the foot. Avoid sinking down into the back leg.
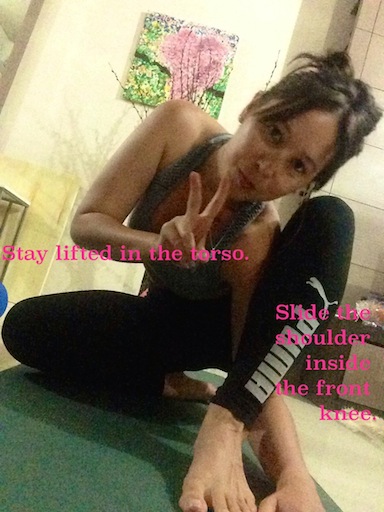
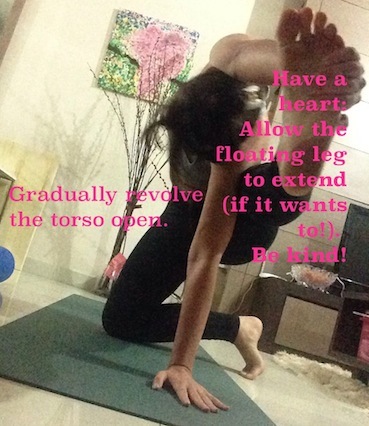
Step 2: Wriggle the front shoulder so that the front knee rests against and even slightly over the shoulder. If you have long arms like me you’ll probably bend the elbows to get under.Step 3: Get lifted by pressing your hips away from the floor and strengthening that front arm. Think about how your torso and supporting arm behave when you are in a sideways plank. As your supporting arm extends, let the front foot start to float off the floor, or just the heel. Keep the shin pressing firmly into the ground and the upper body light.Step 4: Stay chill! If you need a little more stability, tuck the back toes under. Keep the front shoulder and the inside of the front knee close.Step 5: Ok looking a little determined here, haha! Ignore me and take hold of the front foot with the opposite arm. Notice the grip, hold the foot from OVER the front of the foot and then wrap the fingers around the outside edge of the foot. Alot of people get the foot in their hand but sink down into the back leg and struggle to get back up again. Stay lifted by keeping the back leg engaged. Alternatively, just stay here like this, or don’t reach for the foot and keep the top arm along the top side of your body.Step 6: Ok, if you’re still feeling pretty comfortable so far, hang onto the foot whilst you start to let the leg straighten. As that happens, let the top arm slide behind your ear.
Got it?
From here: Gaze upwards, or if that is uncomfortable simply look ahead. In this instance I just gazed directly forwards rather than up as my torso wasn’t revolving as far as usual. What I would go on to do is go back to opening my hips a little more and do you see how that back thigh may want to press forward a little more? I’d work on those and then revisit the posture again and see if anything has changed.
Alternatively:
Keep the front leg bent
Float the front foot off the floor and keep the top arm flat against your side or reaching upwards
Feeling really steady? Try again with your back leg stretched out in one line with the rest of your body
Practice the seated version of the posture, back leg bent or stretched out directly in front or half crossed
Stop at whichever step is most appropriate to you and stay there
Whatever variation you take, keep breathing and stay calm!
Inhale, release the foot; exhale, take a moment. Switch sides. Let me know how you went!
Note: I cannot stress how important it is to practice with awareness. The most important tool for me has been to learn to understand my body. Learn about your body, become aware of what conditions it thrives under and what conditions it does not. Do not force. Find a teacher you can trust to guide you.
Take care and be well! x
*what does ‘there’ mean anyway? In the beginning of practice I would think of ‘there’ as the place where I matched the picture in Light on Yoga. I currently think of ‘there’ as where I can go based on who I am on a given day but I don’t know until I start moving where I will get to.
This is one of the first postures I was taught; if I remember correctly it may even have come before Downward Facing Dog Posture.
It was a long time ago!
But I still get so many benefits every single time I practice it.
To enter:
From standing, step the feet out to the sides and raise your arms parallel to the floor, at shoulderheight, palms facing the floor. Wriggle the right foot 90 degrees and turn the left foot inwards towards the right. Inhale keep extending the spine long and stretching your arms out to the sides. Maintain muscular activation of the legs. Exhale and lean to the right, taking the right hand down.
There are variations on where you place the front hand:
If you practice Ashtanga, you work towards taking the front big toe.
If you practice Iyengar, the front hand rests flat on the floor outside of the front foot.
Or rest the hand on the shin.
Do what you can.
Gaze upwards, or if that is uncomfortable simply look down.
Extend and lengthen everything!
Whilst breathing!
Inhale, come up; exhale, switch sides.
Benefits (and my personal experience):
This pose strengthens the entire leg, develops the chest and improves posture. Mr Iyengar found it to help any respiratory conditions his students had and indeed it may very well have assisted in the reduction of my asthma. Or made me stronger. Any position which improves posture, strengthens the back and develops the chest seems to assist. The stamina you gain as you practice standing postures can help too. And of course learning to finally breathe through the nose rather than gasping for air helps.
Note: We are all wonderfully different so one person may have a totally different asthma experience to another. I just thought I would share my personal experience in case it is of use. The most important tool for me has been to learn to understand my body. Learn about your body, become aware of what conditions it thrives under and what conditions it does not. Find a teacher you can trust to guide you.
How was your cyber weekend? I tried to get into the sale action but I found myself overwhelmed by all the sale windows popping up on my ‘puter. And also we had some major blackouts so that just felt like a sign from the universe.
“No shopping for you, specifically, you. You means Dominique.“
I didn’t have anything I needed or simply wanted but tried to pass of as needed anyway. And I found myself thinking why don’t we just have everything 20% or 30% or 35% or whatever% off year round and we will buy it when we want to. The sort of “I’ll call you” type of response to an invitation to tender. You too? Yeah.
A girlfriend and I were chatting and figured if groceries had a cyber Monday though, different story. But groceries being groceries and economics working the way they do, that didn’t happen. So instead I saved my pennies and worked on editing a video I filmed just before my trip to Bali.
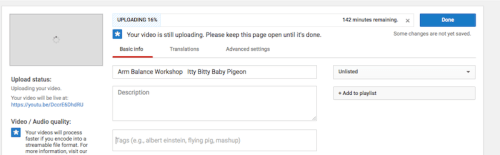
Oh yeah, haha, I went to Bali for a few days. And all I came back with was a lovely time, great memories, a full tummy and a tan. Tell you all about it another time, I really want to post this video first, if it ever finishes uploading though. A little tricky with all the power blackouts we have been having.
Be with you in 142 minutes. I kid you not five minutes later the little bar said it would take another 183 minutes. What’s with the strange math? hahaha
So let’s chat a bit more about what we’re doing in today’s video whilst this baby loads.
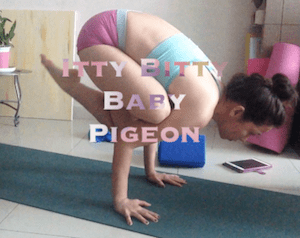
This is a preparatory posture. Some people will know the full version of this pose as Flying Pigeon Pose or One Legged Pigeon Balance. In Sanskrit this pose is called Eka Pada Galavasana. People tend to drop the Eka Pada when referring to the posture and just say Galavasana although B.K.S. Iyengar listed Galavasana and Eka Pada Galavasana as two different postures with the latter being the one we will prep for here.
Gimme a second to squint and count, yep, got the right number of vowels in there. Sometimes one needs to check, you know?
Some Sanskrit here: Eka means one and Pada means leg… soo far so got it. Galavasana is the pose named after the sage Galava. The word for pigeon is Kapota. I know, I know, confusing! When I first started paying attention to the names of postures a lot of them just sounded like Something Something Blah Asana. I just couldn’t get a handle on the front part. And I got a whole lot worse before I got anywhere near better by the time I went for training.
Every second sentence out of me was, “Whaddjyamacallthis?” As soon as I managed to remember one name I’d promptly forget the previous one I had learned.
But a lot of people will know what you are talking about if you happen to mention flying pigeon. But you’d both need to be talking about yoga postures otherwise things just get really confusing obvs. The shape of that front bent leg leaning against your arms is the same as the one-legged version of the posture performed on the floor. Just know that the pose goes by more than one name.
I am calling this version we are attempting Itty Bitty Pigeon Pose because that back leg is not yet stretched out as in the full expression of the posture, it’s still tucked in close to the body. This makes it a little easier to focus on locating that exact tipping point you need to get the balance going. And here we thought we’d never see the likes of Physics again after high school.
The video is pretty straight forward, but make sure you are warmed up before you launch. For example you can go for a 20 minute march around the block, or you can do a few rounds of Sun Salutations, or a few cycles of my easy to do 2 minute yoga sequence (here).
Yoga is all about expressing curiosity and learning new things. So once you are up, try stretching out that floating leg and see what happens! Fly, birdie, fly!
[gasp] I’m flying, Jack!
C’mon, if I didn’t say it someone else would have. What a line. And they totally could have both fit on that door. Move over Rose, blimey.
IMPORTANT: Please be aware that if you are not yet comfortable in a plank position, you may still need a little more time before you visit this. Don’t rush! In the Ashtanga practice for instance, this posture is in the third series. THIRD! There are people (cough, me included) who may or may not just stay in Primary for the rest of our lives. B.K.S. Iyengar rated the intensity of this posture as 21, the most difficult posture being 60. So take it easy, slow and steady. Taking the time now to develop a strong foundation, smelling the roses along the way, will save you the heartache of hurrying before you are ready and perhaps even hurting yourself. You need to be careful and practice safely. Be kind! Enjoy the scenic route! How often do we get the luxury of taking things slow?
Happy workshopping!
Questions? Holla! Feel free to discuss down below any of the following:
Who B.K.S. Iyengar?
What Ashtanga?
Kapota what?
Is this still yoga?
What does Galavasana look like then?
What does it take to rate a 60?
Who Jack? (Where have you been…)
What door? (See above re: Jack)
Does anyone else feel terrified when they see flying pigeons IRL?


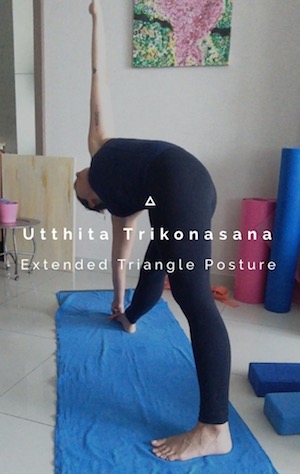 Utthita = Extended